-Art Making-Questioning-Reflection-Contextual Information-
A Week at Lincoln Center
... to perceive, a beholder must create his own experience. And his creation must include relations comparable to those which the original producer underwent. They are not the same in any literal sense. But with the perceiver, as with the artist, there must be an ordering of the elements of the whole that is in form, although not in details, the same as the process of organization the creator of the work consciously experiences. Without an act of recreation, the object is not perceived as a work of art. The artist selected, simplified, clarified, abridged and condensed according to his interest. The beholder must go through these operations according to his point of view and interest. -John Dewey, Art as Experience
This past July I was accepted into a one-week training at the Lincoln Center for Education in New York. The majority of the what I would be learning had to do with a pedagogy system based off of Maxine Greene’s beliefs in aesthetic education. In college I was first exposed to aesthetic education from my professor Dr. Gena Greher who molded concepts of the Manhattanville Music Curriculum Project into our pedagogy classes. The ideas I learned from those experiences were to break down key concepts in a music composition by giving students an opportunity to place themselves as the musician making similar compositional choices-and therefore draw connections with the original composer and composition. Students could draw on their own personal backgrounds and experiences when making the music without the need for standard notation. This past year Philip Yenawine came to Pentucket on the first day of school for teachers and brought us into his aesthetic education system of Visual Thinking Strategies (VTS). I have been using variations of aesthetic education with my own students since my first year teaching a decade ago. I remember Noteflight composition software coming online and with assistance from Dr. Alex Ruthmann, selected a piece of art, posted reflective questions, and began a lesson on incorporating this with an exploratory composition project (http://pentucketmusic.weebly.com/art-infused-composing-with-noteflight.html).
The truth is that my understanding and utilization of aesthetic education was confusing and random. I am so thankful to have had the opportunity to undergo the training at the Lincoln Center for Education as I think I now have a very clear understanding of this teaching method and how to utilize it. I am hopeful that this blog post will be helpful to other teachers.
My Big Picture Synopsis of Aesthetic Education:
In order for a concept to have meaning for a student, he or she must be placed in the role of artist. Digging deeper-any form of art (visual, audio, movement) can be the vehicle by which the concepts can be connected. I had to really spend time reflecting to understand this. I was initially thinking of this in my role as music teacher. However, it also applies to any subject area. For example, an English teacher can utilize the arts to teach and connect concepts. This might be a hard concept for an arts teacher to comprehend. We spend years in training to make sure what we teach is of the highest quality. Can you imagine another teacher who is not trained teaching your craft? Just saying that last sentence created a lot of fear in the back of my brain that I’m getting fired… no need for the music teacher anymore. Just the opposite, we should be seen as a resource for all teachers. I’ll come back to this later.
A step-by-step approach (at least from my understanding).
Lesson/Unit Development from the Teacher:
- Select a piece of art. In the back of your mind you are possibly selecting something that will end up teaching a concept that is part of your upcoming unit. Old school: Students read Hatchet by Gary Paulsen and write a summary of the book. New school: You find a piece of art relative to surviving in the wilderness and have students break it down through various meaningful aesthetic activities. The activities weave into one another and result in published art that has multiple layers of reflection and is presented to an audience.
- Spend time as the teacher making “noticings” using the key questions below and write down your findings.
- Describe: What do you notice? What do you see? What do you hear? How would you describe?
- Analyze: What relationships do you notice among the elements? What do you see or hear that is similar, different, or of a pattern? How is the work of art put together? How are the individual parts put together? What patterns or relationships do you identify in the work of art? What questions do you have?
***Make sure to hold off on students interpreting until after they have described and analyzed...they usually try to jump the gun on this!
- Interpret (Personalize): What connections do you make to your life, to your world, to things you have read, to what you are studying in school? What do you think is going on in this work of art? What is it about? What ideas was the artist trying to convey in this work of art? What does in mean? What does in mean to you? Does it represent something-if yes what? Doe the work of art evoke any emotions? What does it express? If this work of art was a metaphor for something, what might it be?
- Develop activities that put students in the role of artist, musician, videographer, dancer, actor, etc.” that directly relate to the concepts to the work of art you will eventually present to them. You will want one or two pre-lessons leading up to the first experience the students will have with the work of art followed by one or two post lessons which include reflection and publishing. What I got out of the simulations from our course was to keep the pre-projects very simple and make sure they have opportunities for students to incorporate personal meaning into them.
Part A: Pre-Lesson Simulation:
- Pick two objects you think represent you or that you have a connection with. Combine the two animals using tracing paper.
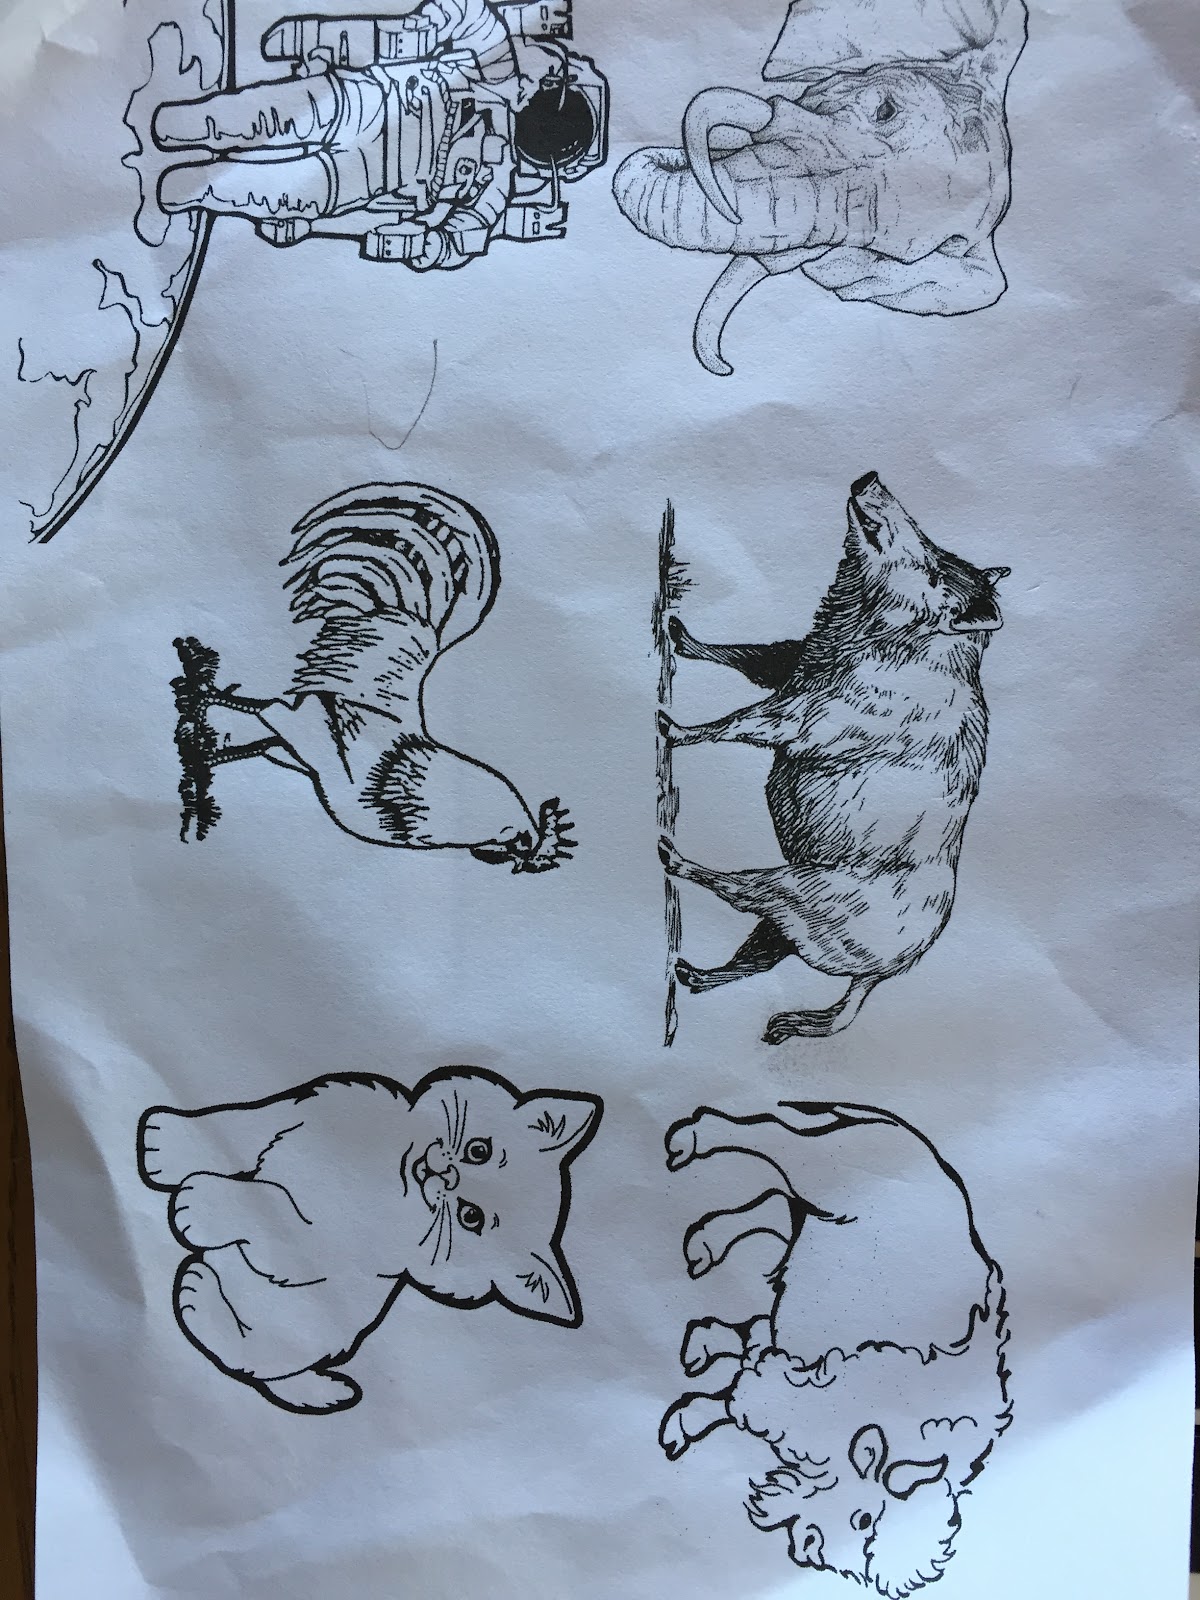
2. Get into pairs and switch your pieces of art. Spend a minute asking questions to yourself about the art and then try to summarize what about the art reflects your partner. The partners will then share out their findings with each other.
Key Aspects to the activity:
- The instructions were simple.
- Any level of artists could complete this activity as we used tracing paper.
- There was time for small peer reflection. Overtime you will notice students build a repertoire of questions to ask themselves when experiencing art. Starred Thought: We must get rid of the stigma of “I’m not good at art...I’m not good at singing.” We’re ALL artists and we’re all Musicians! The level of expertise varies but we must do everything we can to make sure we put a stop to the stigma behind our varied abilities of art making.
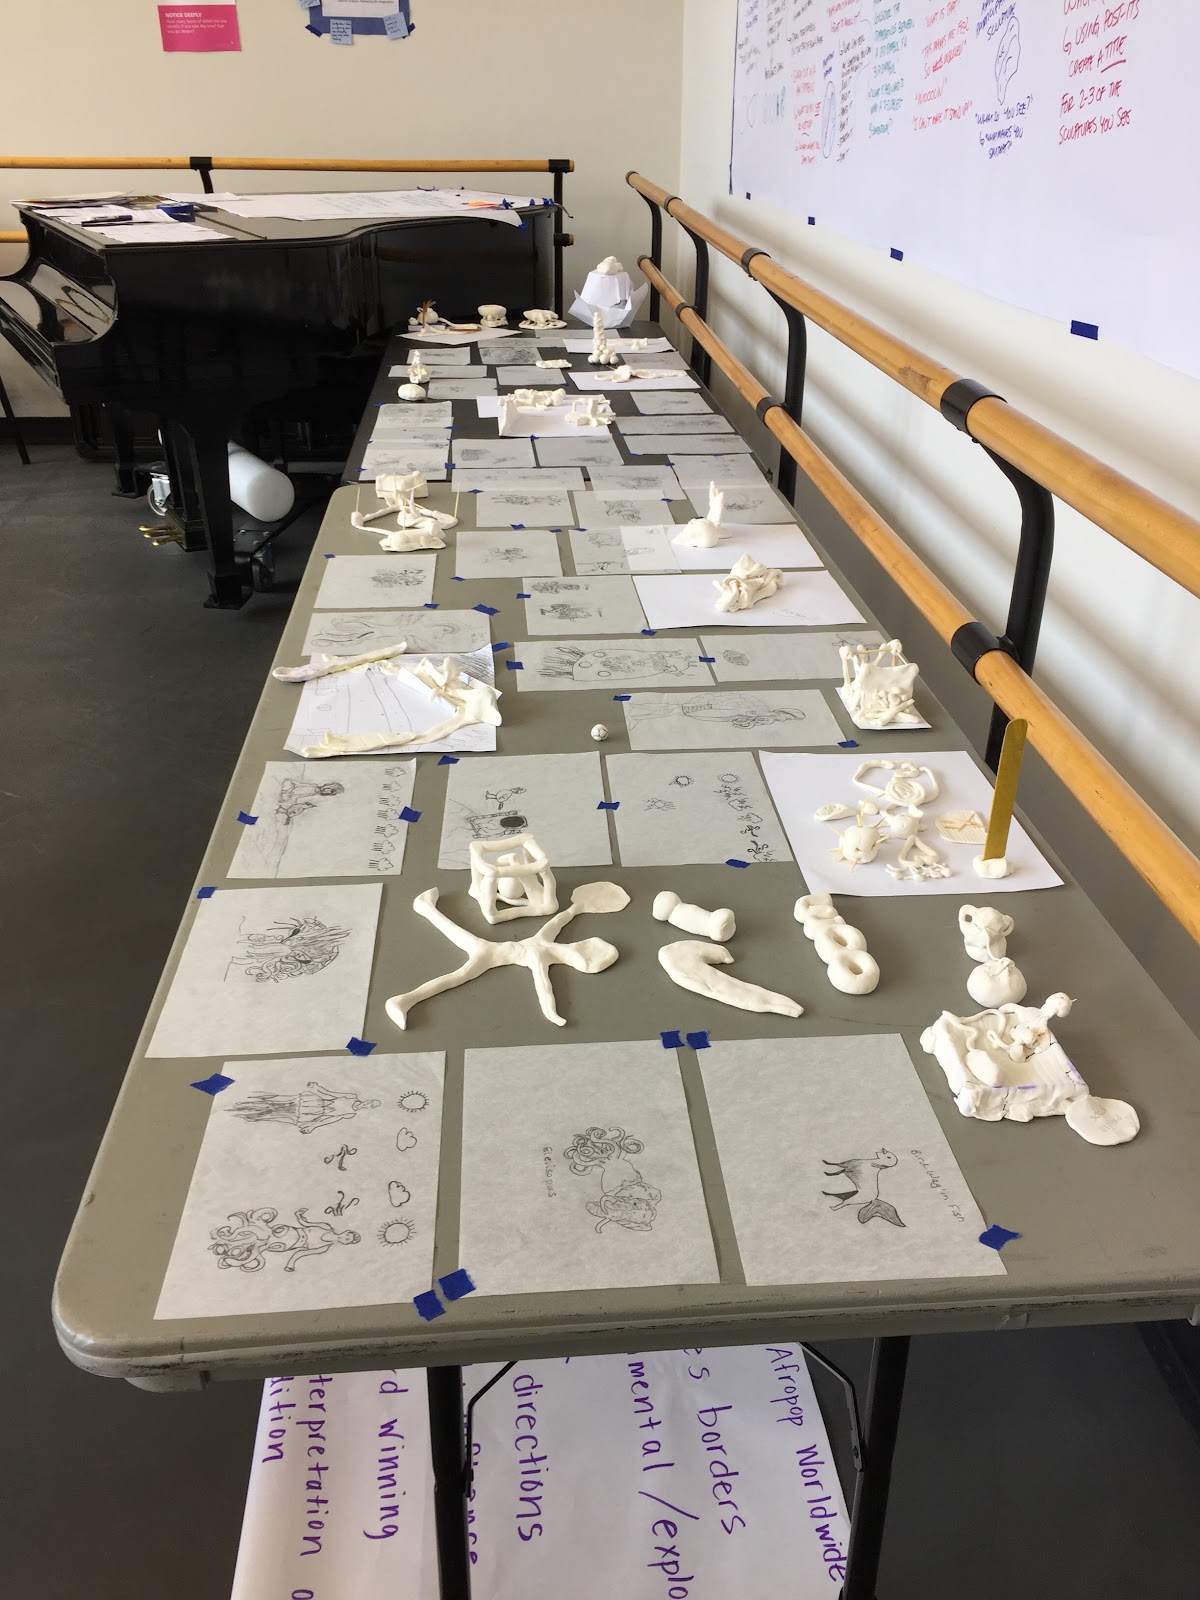
- You can do a museum tour and have the students hang up their artwork. Have students walk in circle to view the artwork and then do small or large group “noticings.”
Part B: The Viewing of the Artwork
Have students view the artwork and give them time to personally reflect in a journal. You may want to guide them with journal questions with ones from LCE for describing, analyzing and interpreting. The self-reflection time is a very important part of the process. Then have the students share out the findings in either full class, small groups or in pairs. When doing large class sharing, the teacher will be able to eventually ask “questions with a lens” as LCE calls it. The teacher knowing the key concepts he/she wants to get out of the students can start asking unbiased questions which help get the students to lank on these key concepts.
Part C:
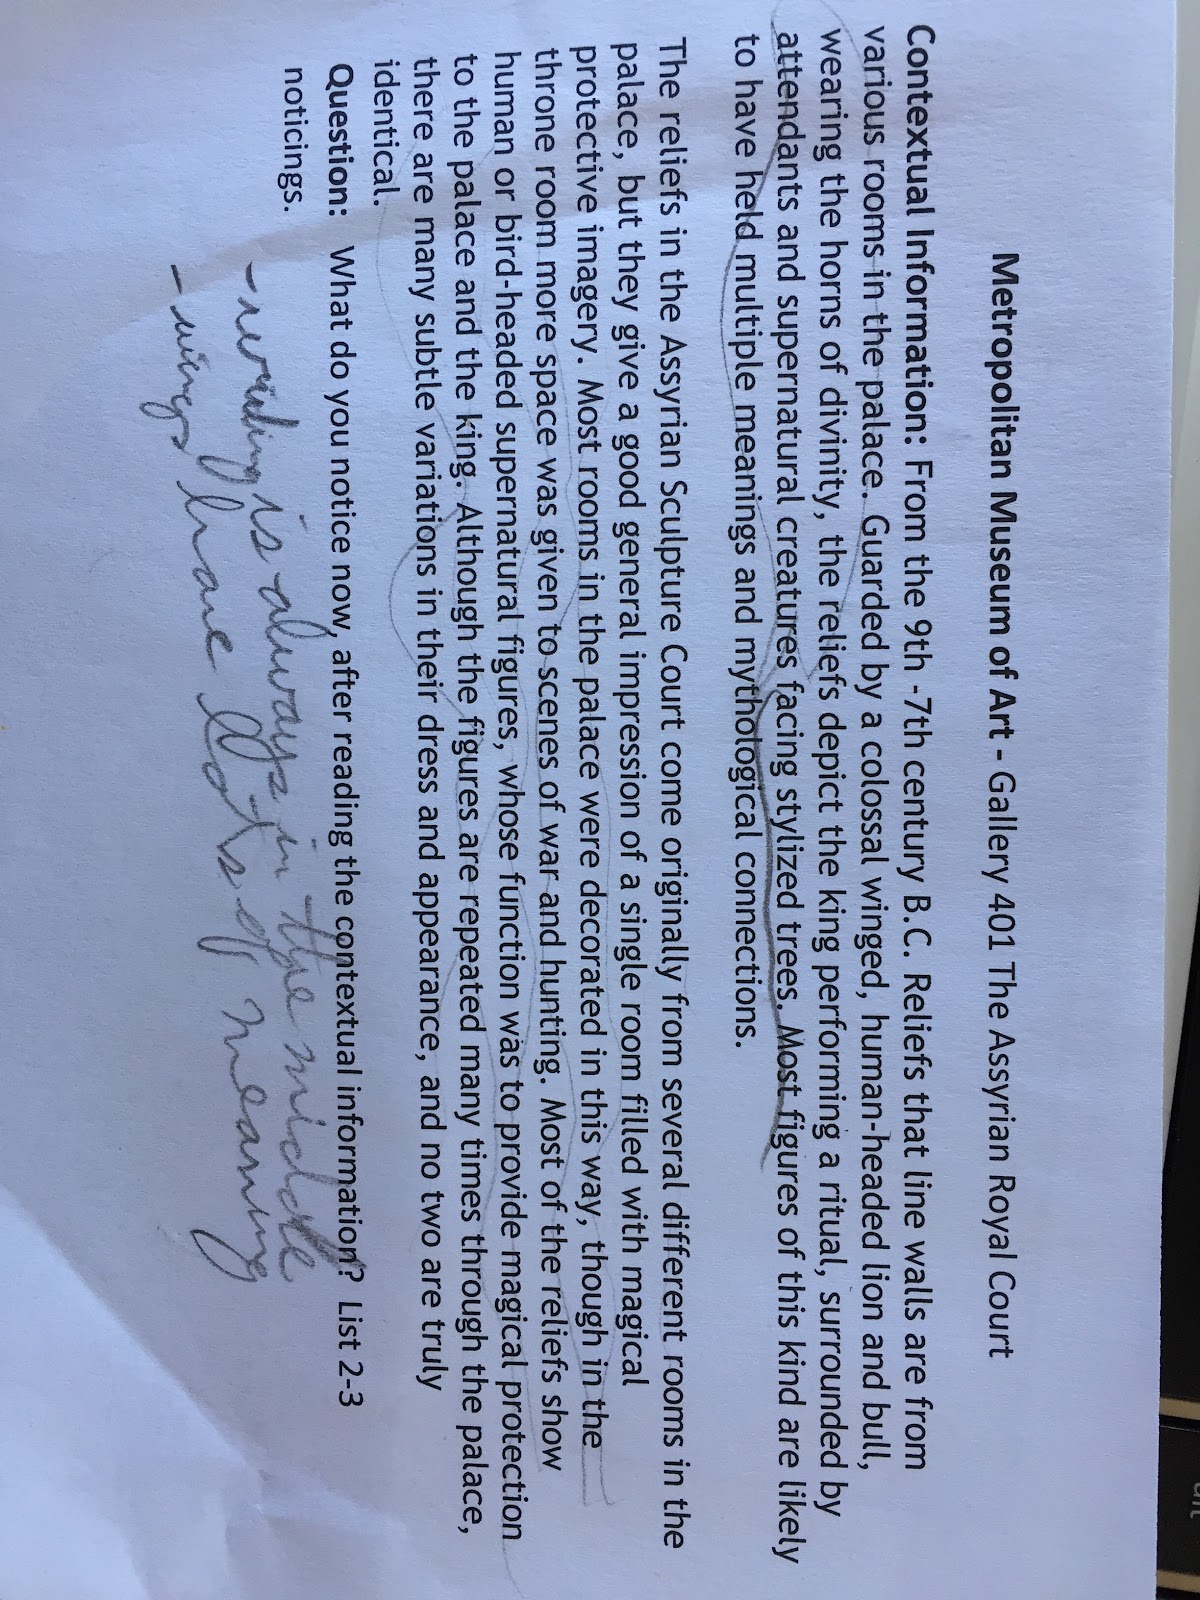
The contextual information. You have to decide how this is going to come out. Will the students look up the contextual information? Will you hand it to them? We had a large discussion about this. We discovered as teachers that we usually give too much contextual information at the start of a unit. This in turns decreases the possibility for students to discover, create, and make connections. It kills the potential imaginative spirit that is in all of us. We also discussed to what degree is information contextual. We were somewhat split on if if we should be telling the students the title of the work-will that create bias and shut down their imaginations? I think the end result of our group conversation (let’s call it group therapy) for this was that it is a personal choice for the teacher.
For this activity, we received the contextual information after we debriefed/reflected on the piece of art. It is important do note that we then reflected in our journals again after receiving the contextual information.
Part D: Post Creation Activity
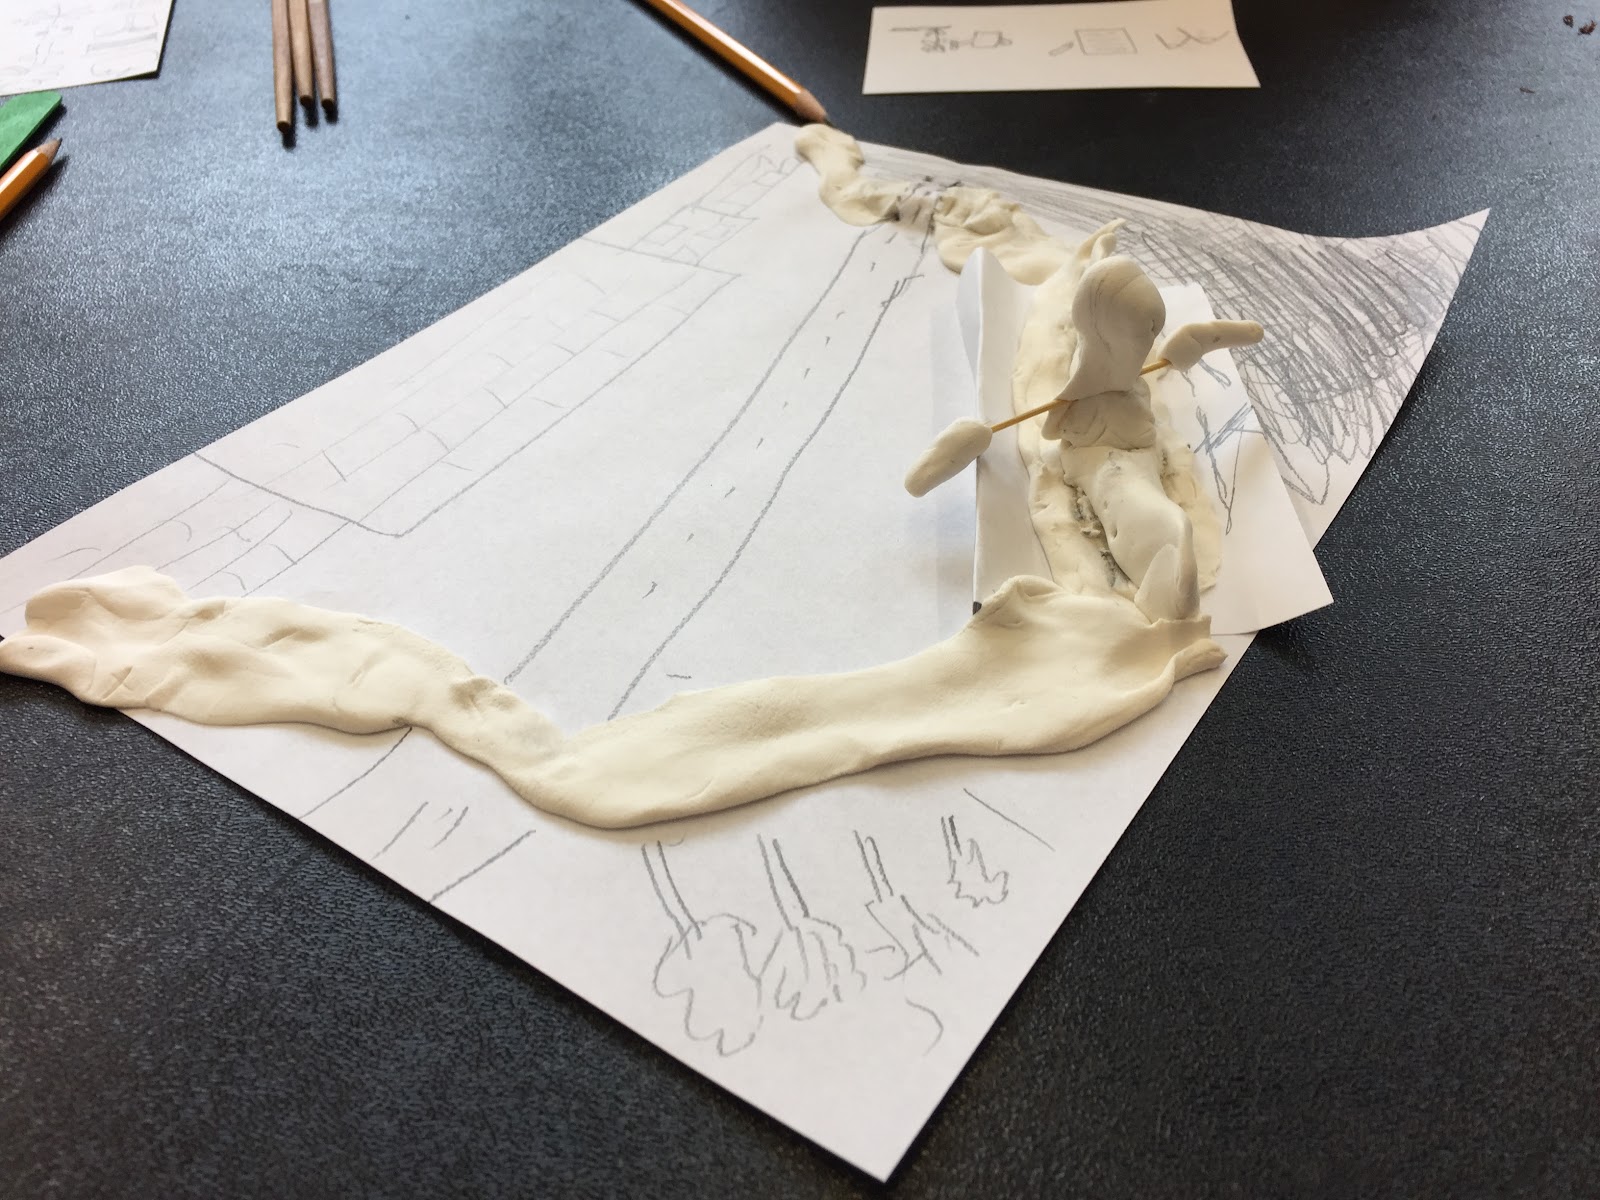
This is where the magic occurs and everything reflected and interpreted comes together. Now that the key concepts have been discovered, have students create using the key concepts and make sure they can add personal meaning to it. After learning about symbols, we were tasked to make objects that represent us through clay. Though this was a pre-activity, I think it would work perfectly for a post activity. After creating, we reflected, shared out, and then combined our clay works with partners that we felt reflected similar traits in the pottery.
Other Key Concepts to this Process:
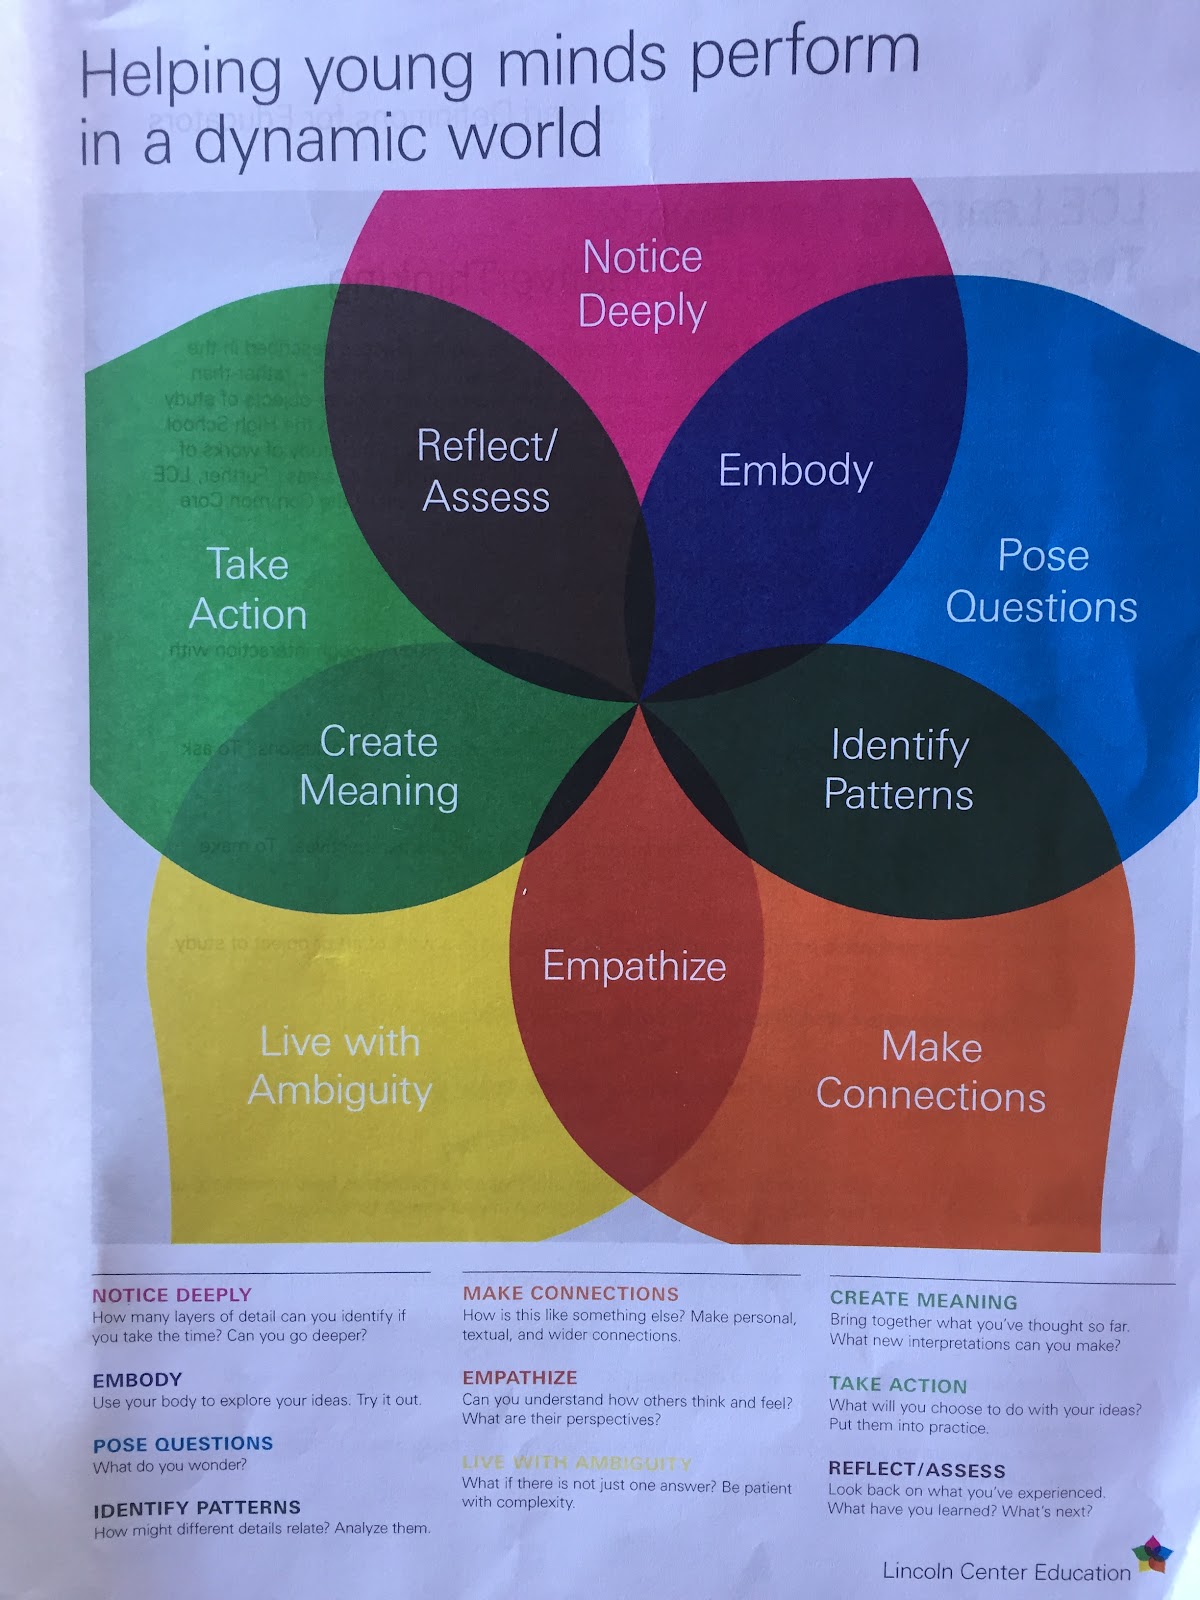
Capacities for Imaginative Thinking: LCE developed ten capacities for utilization in unit planning. As described in a handout “the word capacities rather than knowledge or skills indicates that what can be learned from works or other objects of study is inexhaustible. We learned that a typical activity/lesson/unit will focus in on just two or three of these capacities though many of them will occur naturally as part of the creation process.
Inquiry: LCE states that “inquiry has a very particular kind of meaning that differentiates it from that typically undertaken in the social or pure sciences. It is also different than philosophical inquiry, which can focus on the nature of inquiry itself. Our version of aesthetic inquiry, based on the work of artists, follows closely the process artists us as they create works of art. As such, it included use of senses, emotion, and other forms of embodiment, along with cognition (including problem solving skills and imagination)....questions are used for a multitude of specific purposes, among them:
- To consider the choices in the ar-making process;
- To go deeper into the work of art that has just been experienced;
- To prompt research of context;
- To reflect upon and assess one’s learning;
- To help students develop their own questions.
Key Ideas: When observing a work of art, the key ideas are concepts that are not objectionable.
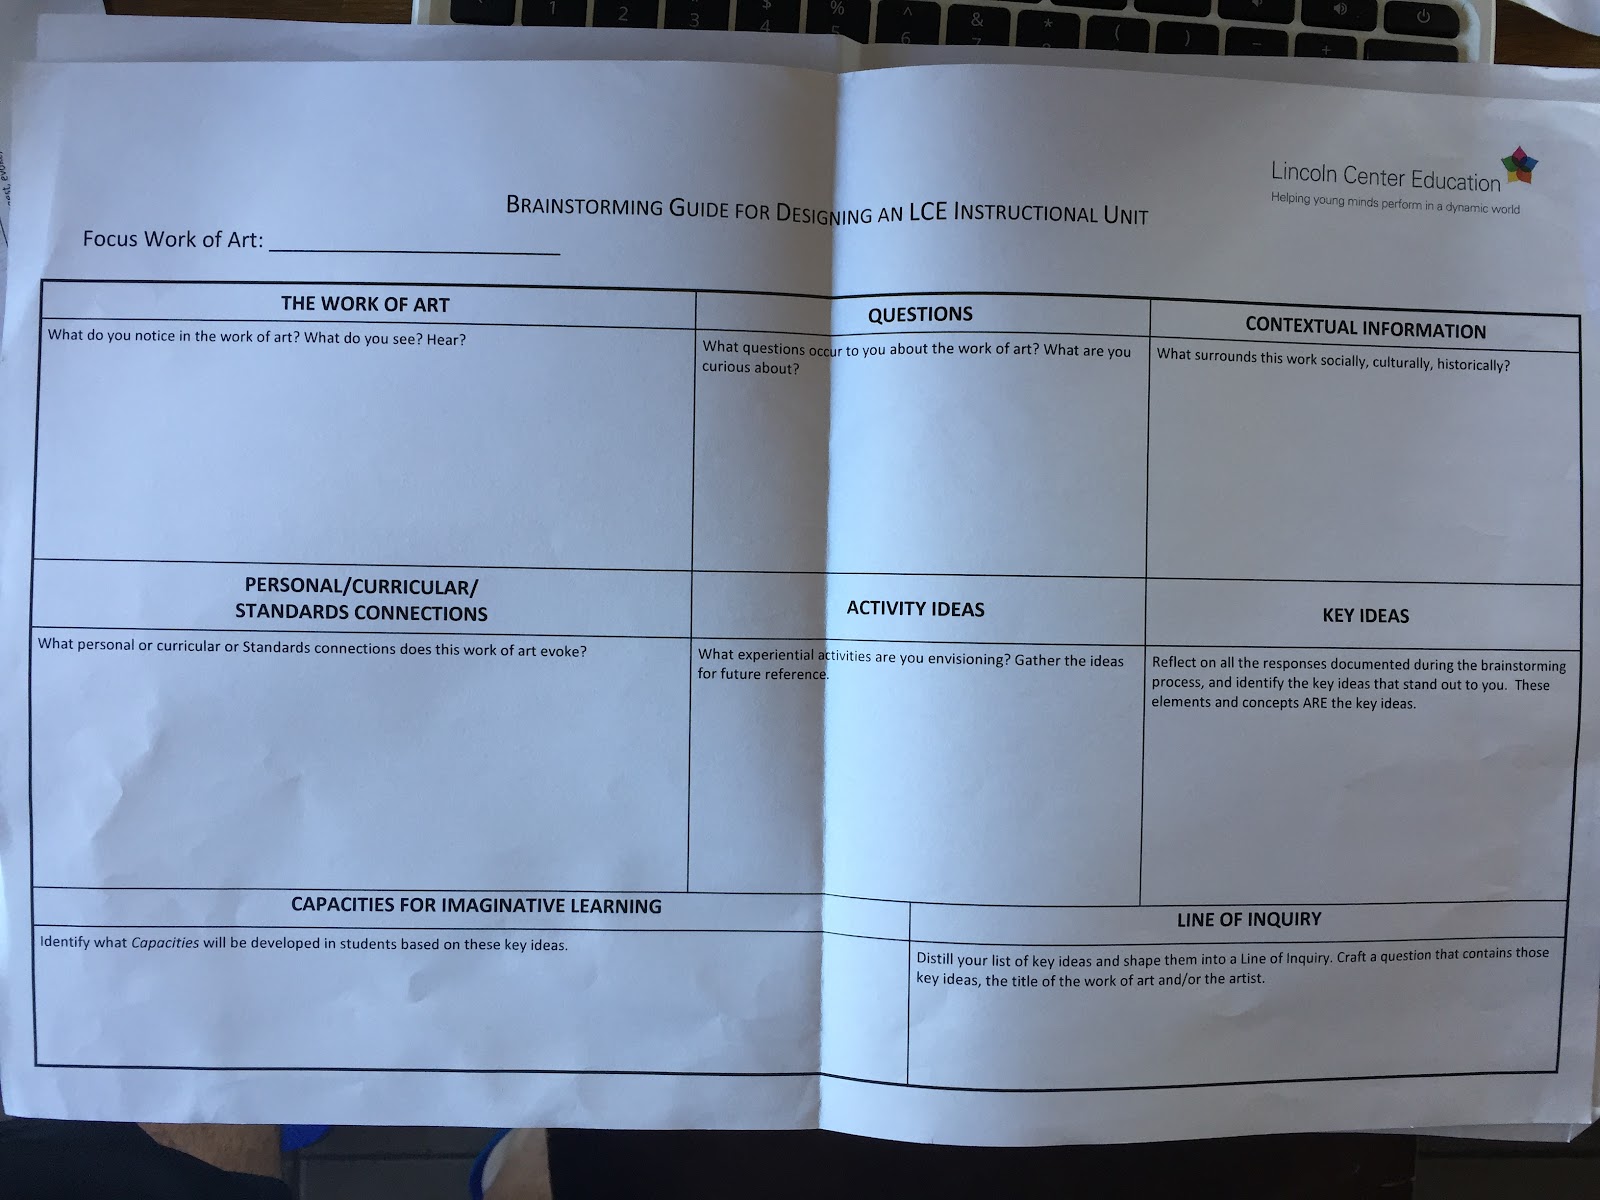
The Line of Inquiry: LCE defines this as “ an open, yet focused question that incorporates elements and concepts observable in a specific work of art (key ideas), and relates to the concerns of students and teachers. It invites questioning, guides our exploration throughout, and serves as the framework for constructing experimental lessons.”
How to make the line of inquiry:
In (name the piece of art), (name the artist if known) (a verb: eg. use, combine, juxtapose) (key idea/element/concept of the work of art) and (second key idea/element/concept of the work of art) to (a verb: eg. suggest, evoke, explore, investigate) (the what: some effect created; a larger concept of idea in the work of art). Here is an example I wrote during one of the projects we took part in: 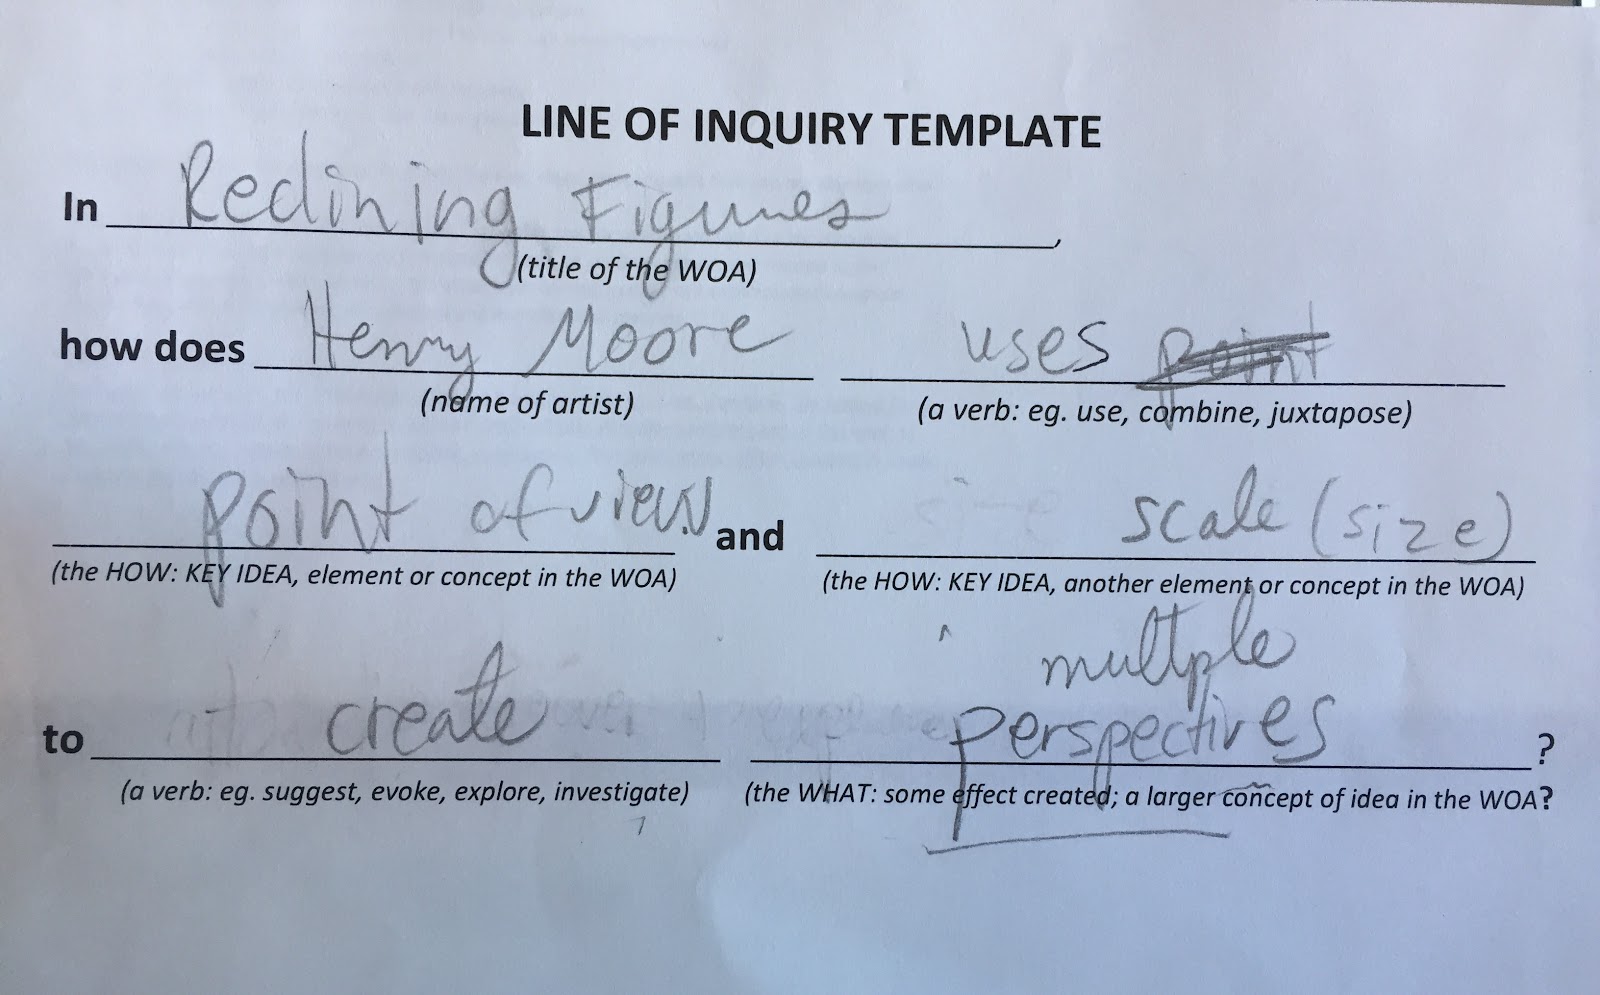
Lesson Plan Template:
Comments
I started on COPD Herbal treatment from Ultimate Health Home, the treatment worked incredibly for my lungs condition. I used the herbal treatment for almost 4 months, it reversed my COPD. My severe shortness of breath, dry cough, chest tightness gradually disappeared. Reach Ultimate Health Home via their website www.ultimatelifeclinic.com I can breath much better and It feels comfortable!